We had designed our own greenhouse and already bought the posts, plastic and some other materials when we were invited to a “Be The Change” event at St Marys and we saw the poly tunnel idea on this related website http://transitionderwent.com/whats-on-2/poly-tunnel-bulk-purchase/
We adapted the design to suit our garden as we are building on a solid slab of granite with only a few inches of soil. We bought the poly tube from Becks in Launceston for $2.55 a metre. It was on a 100 metre roll which was too large for our ute and had to be delivered by truck, cost $30. We are using the remainder for a net enclosure for our orchard. I will post photos of that project when it is complete.

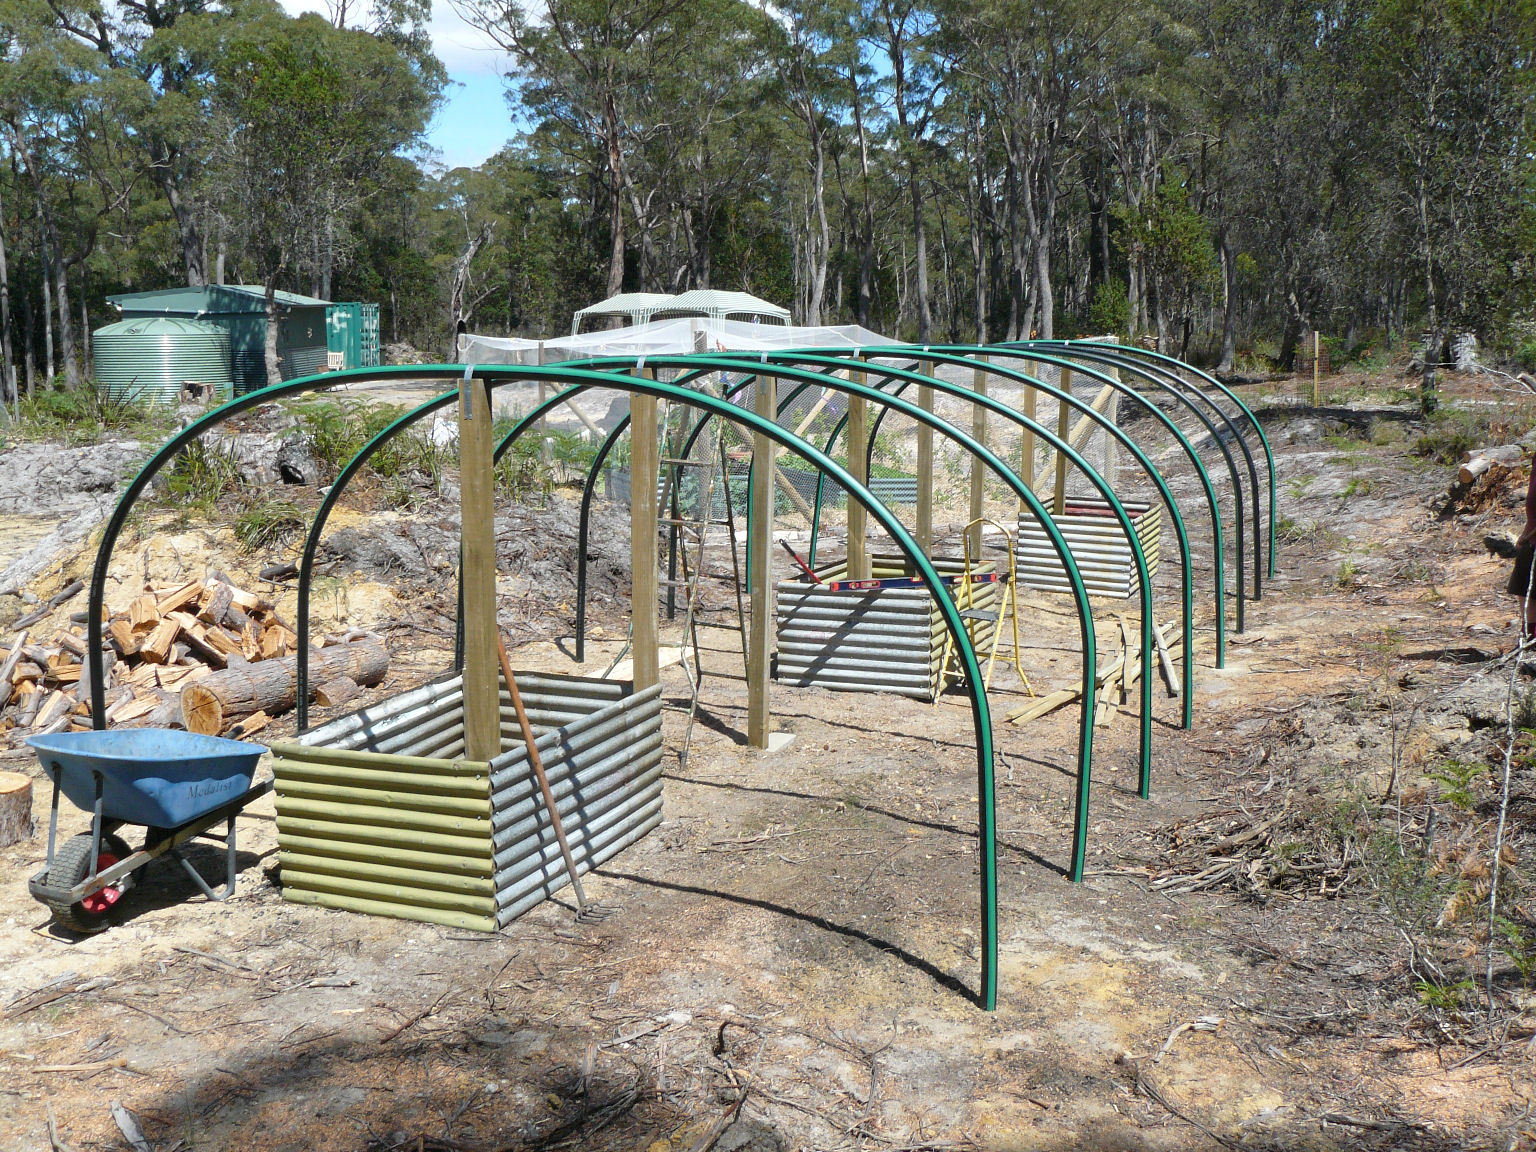
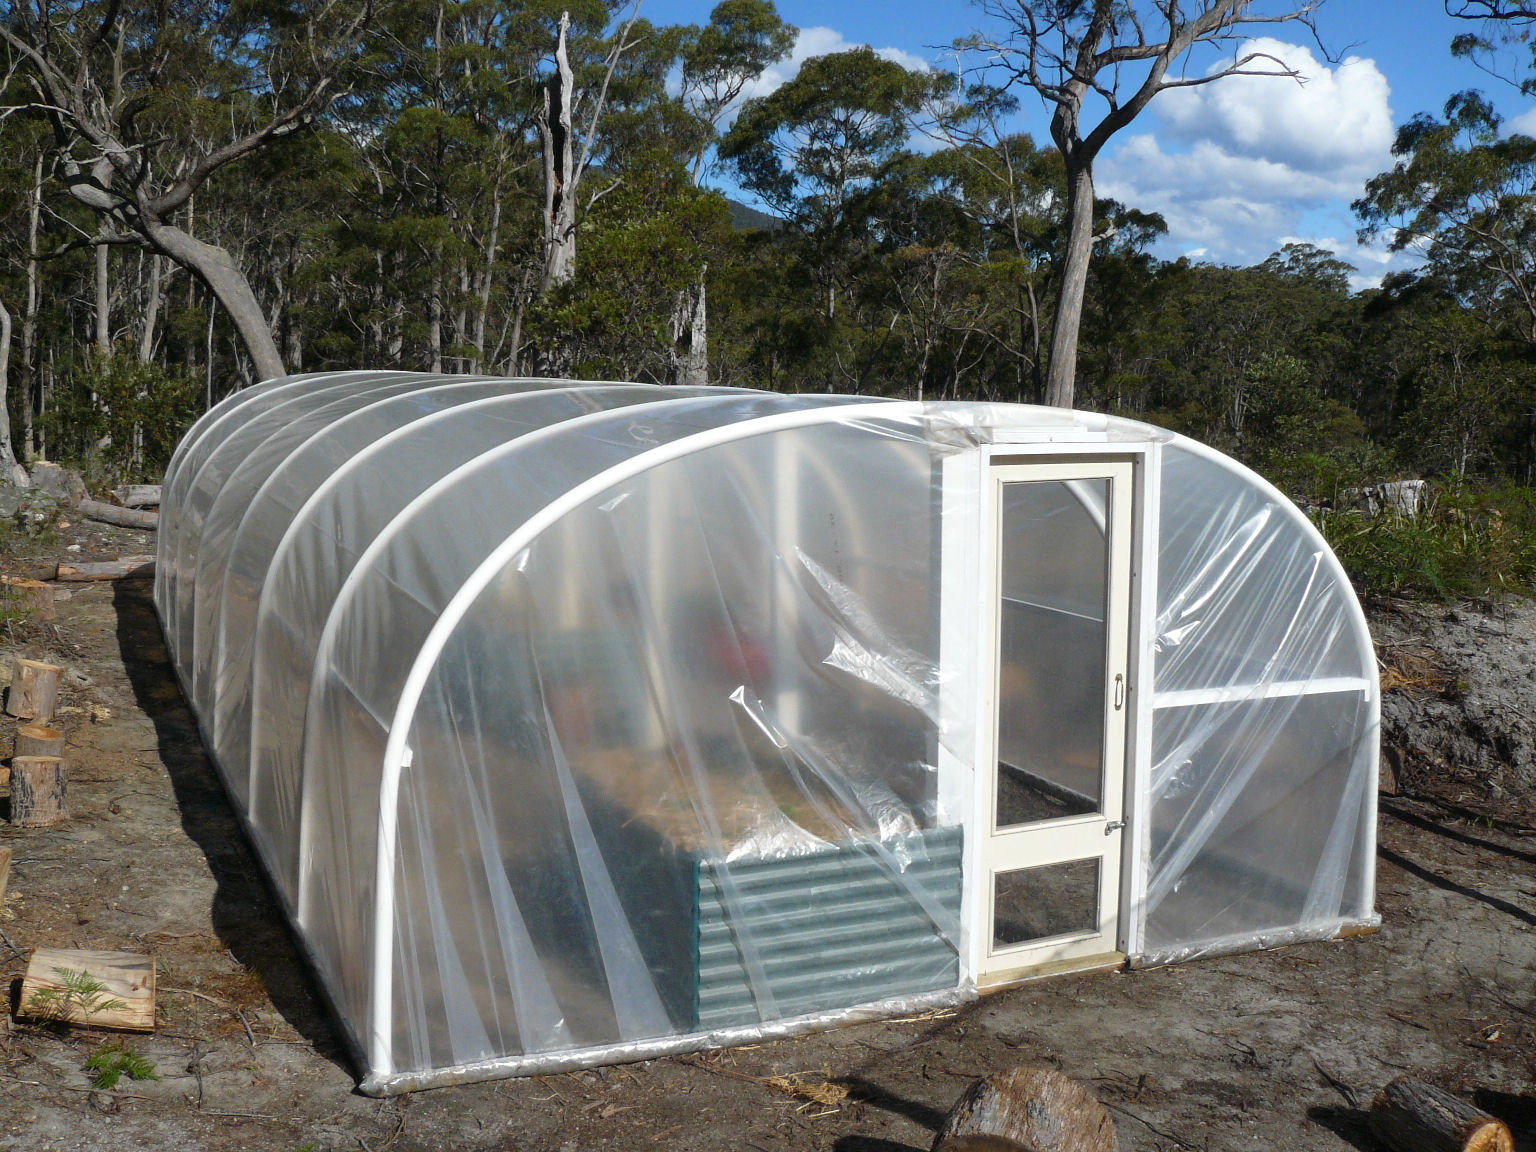
After laying out the position of the star pickets we couldn’t bash them in and had to drill into solid rock with a masonry bit. This took all day, plus 20 Anzac biscuits and several cups of tea!!! There are eight arches altogether giving us 10.5m in length and 4m wide, 42sqm in total.
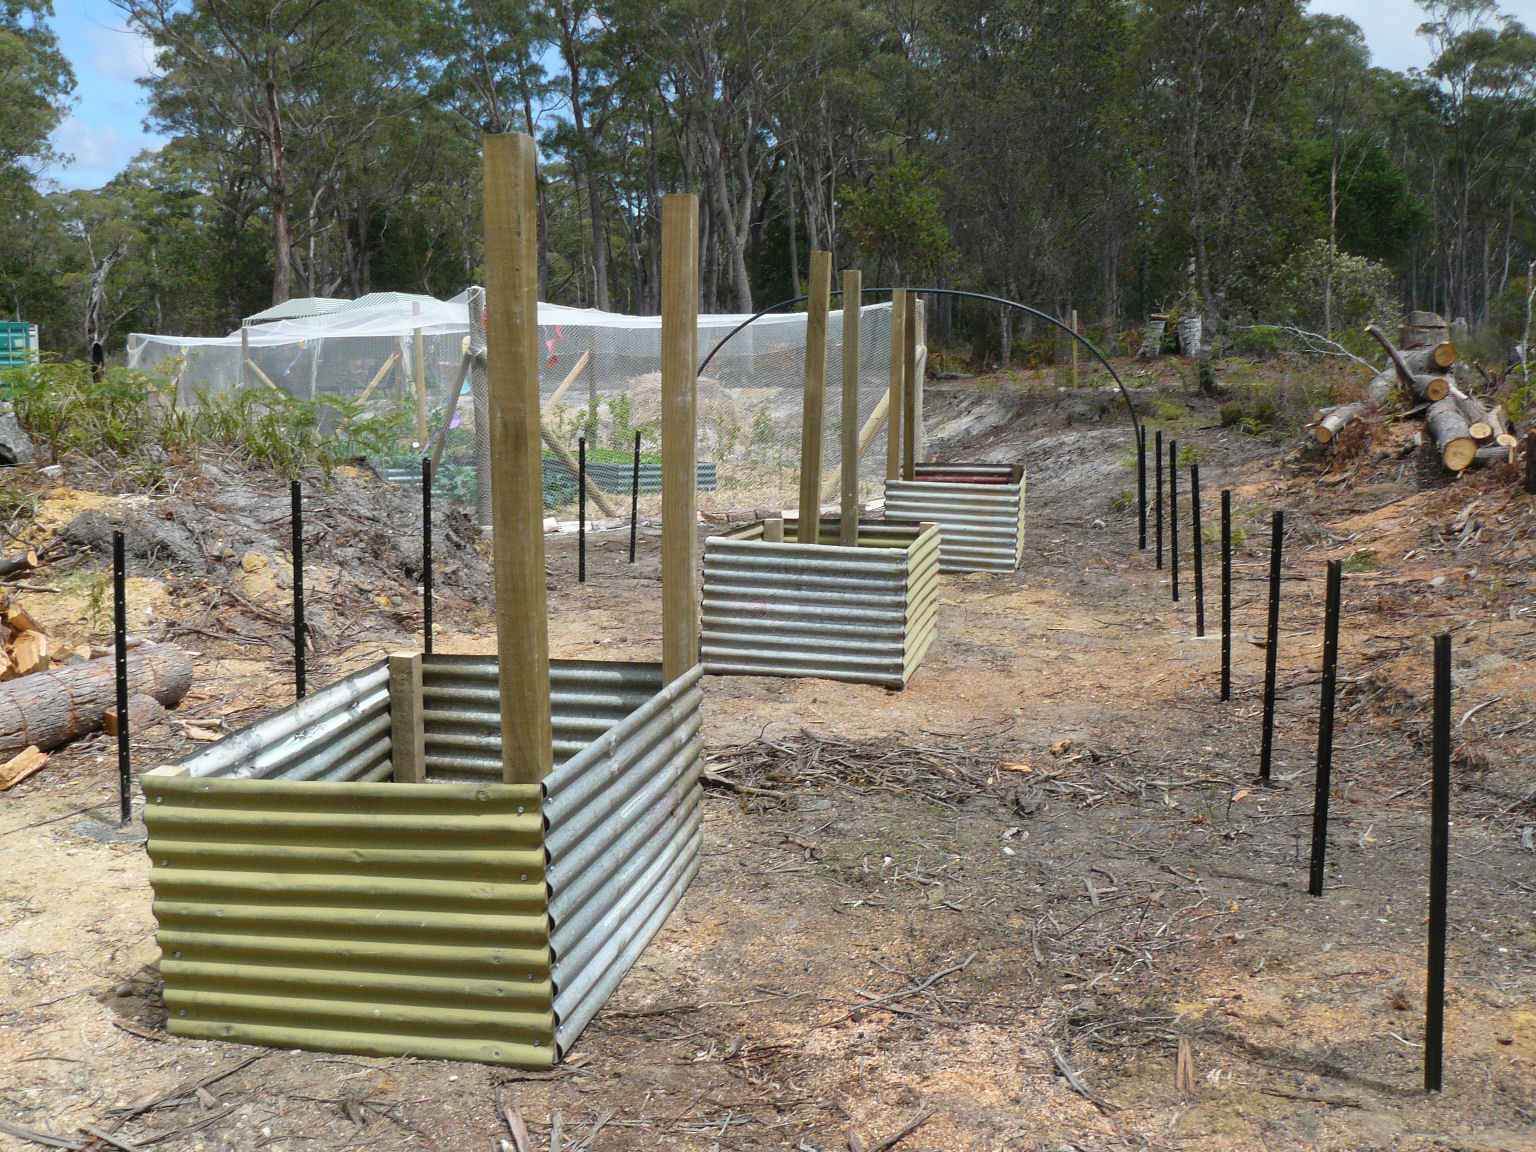
Once the pickets were in place we made three raised beds from recycled roofing iron to hold the posts in position. This was easier and more eco friendly than concreting them in place. The beds not only hold the posts but provide weight to stabilise the frame in strong winds.

We cut the tubing into seven metre lengths and pushed it down onto the pickets, this is a two person job, but was fairly easy to do. Instant frame!! We were very impressed with the strength of the frame already, and we hadn’t even put the timber bracing on. You could use this frame for many applications and Nev is planning structures all around the place much to Bryon’s disgust.
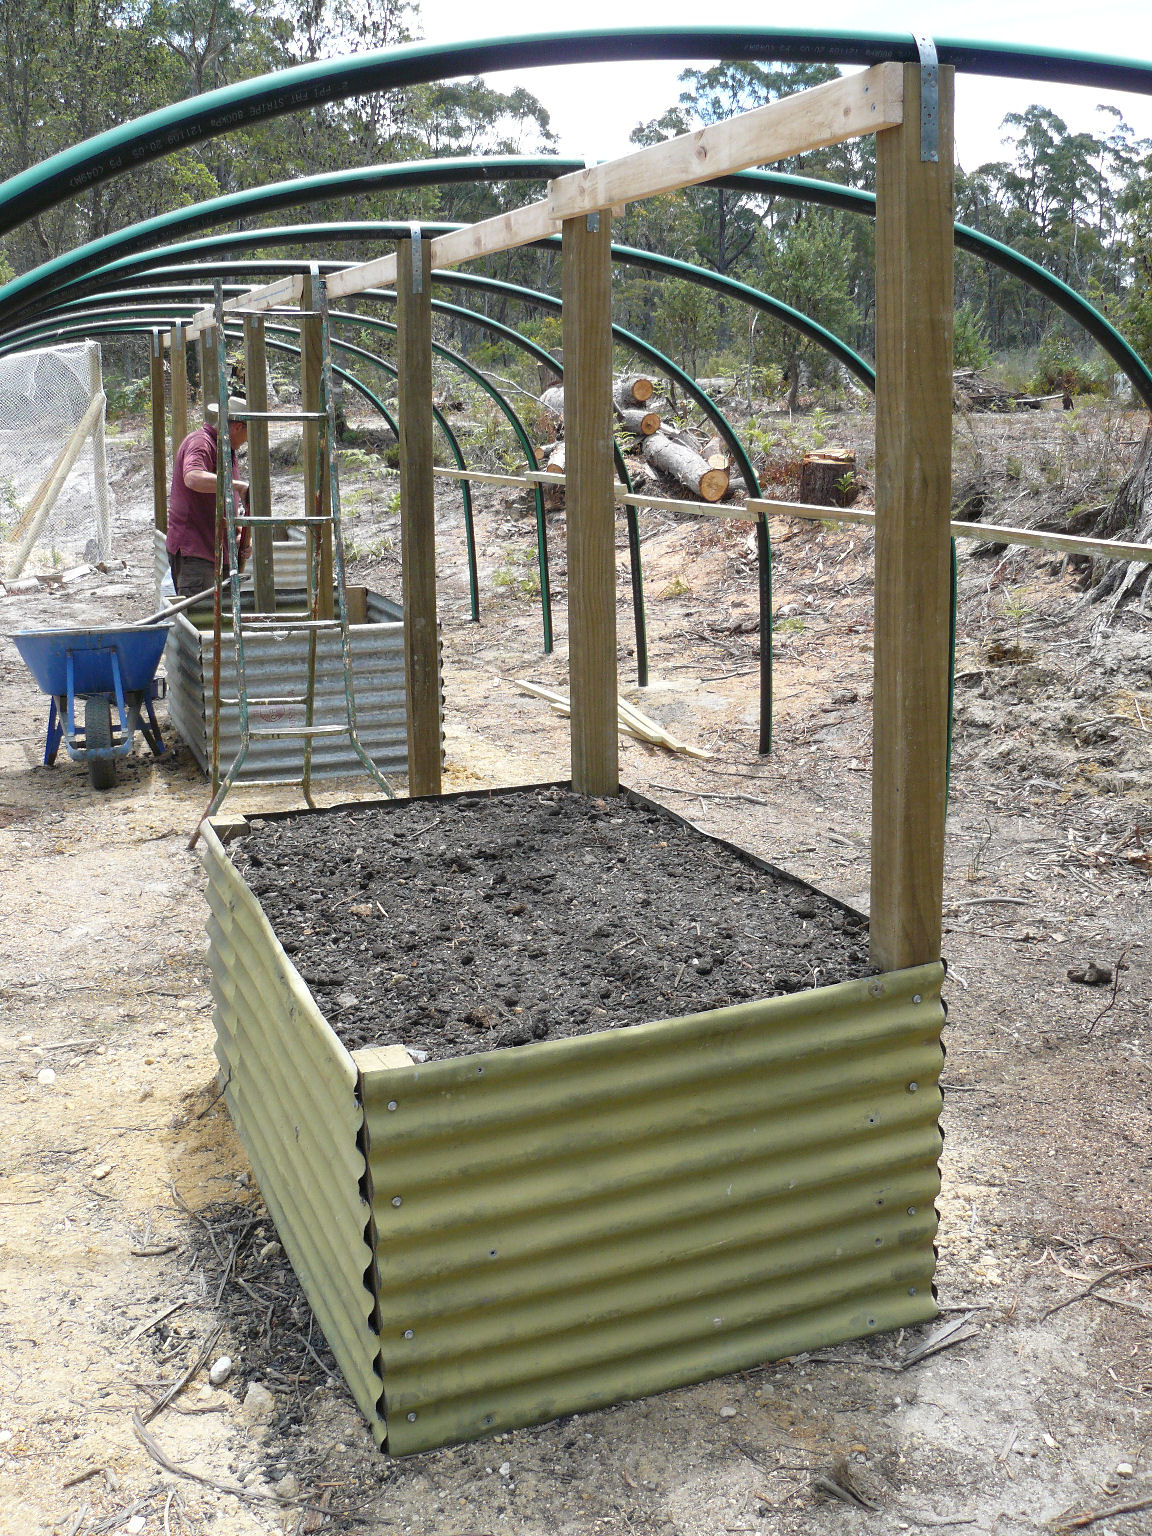
This shot shows the bracing. We have used 75x38mm pine for the side rails that was left over from another job, and 90x45mm merchant grade pine for the top rail. We decided to use some brace strapping to hold the pipes to the posts as this gives a seamless outline for the plastic and the top rails on their sides will provide ample places for hanging pots.

After we had finished the frame we painted it white using left over paint given to us by a friend (thanks Tim). We did this to reflect the sunlight from the black tubing and metal straps so it stays cooler and doesn’t affect the plastic over time.
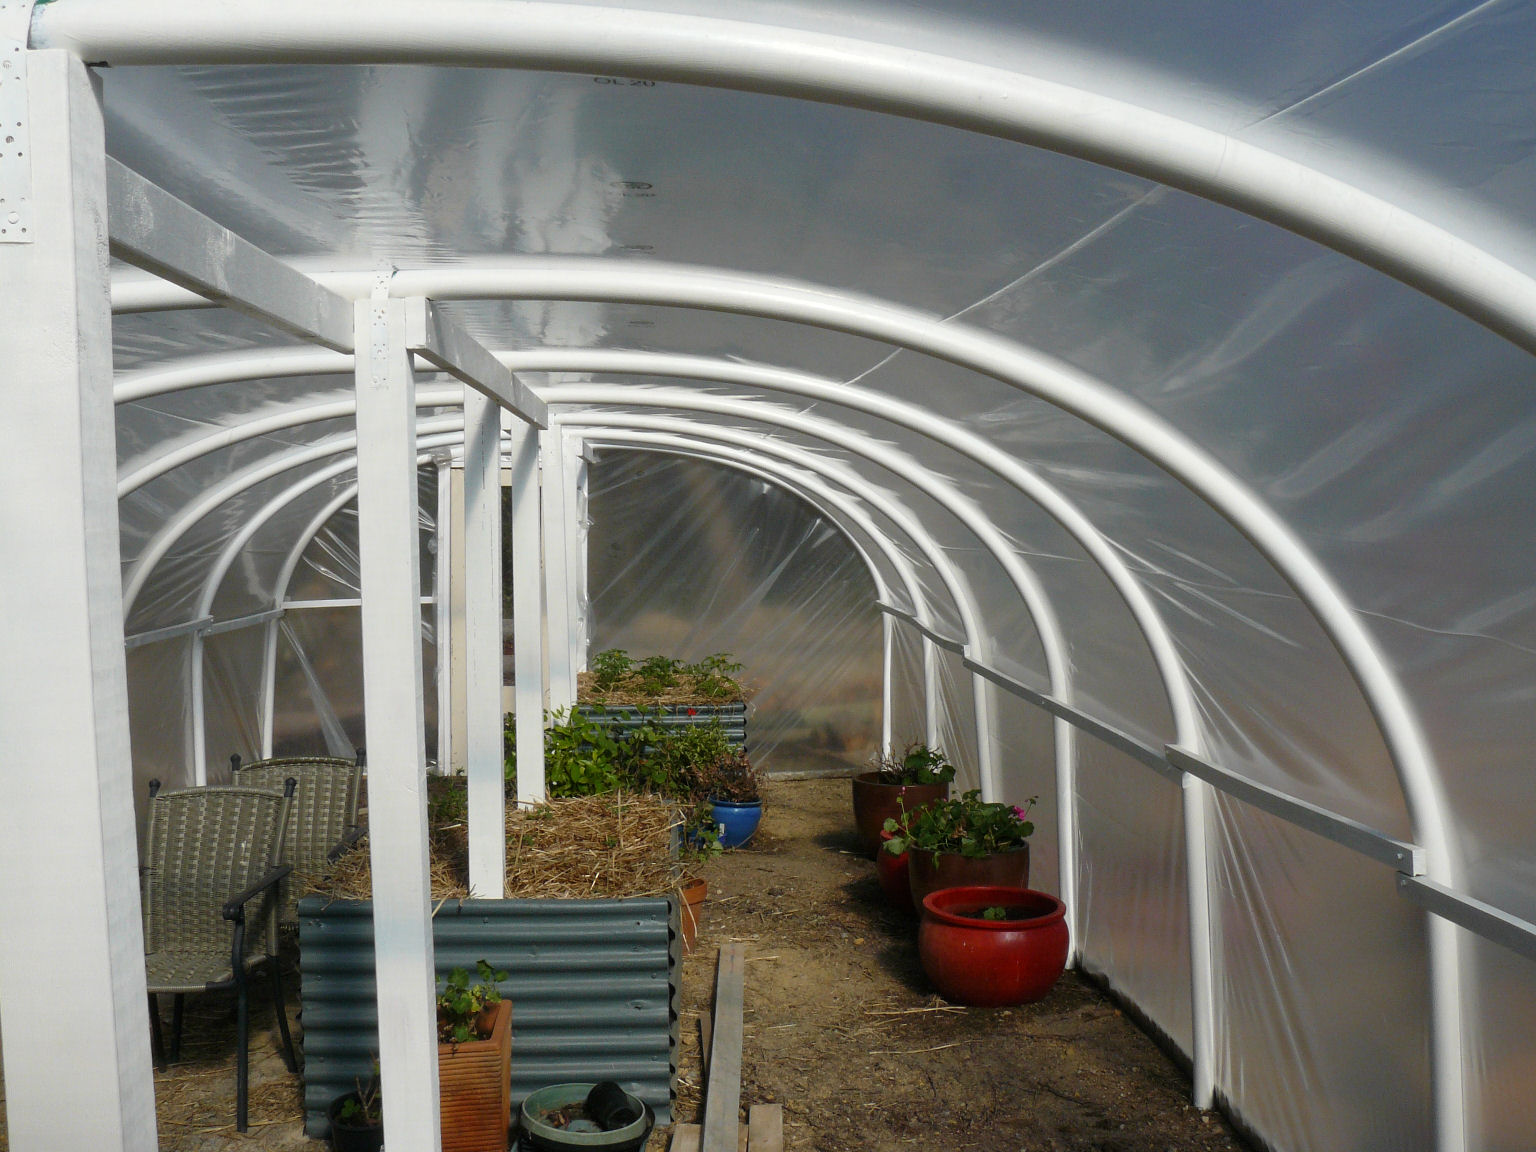
The next step was putting the plastic on. A 25m roll of poly-tunnel plastic cost $208 from Waratah Distributors in Launceston. It is 7.5m wide to suit the 7m arches and is made from a UV stable non-rip plastic. It is important to get the right plastic as some tear very easily and also break down rapidly in the sun. Some I bought for a cold frame previously only lasted one season. The supplier indicated this stuff should last at least five years and it is very hard to tear.
Putting the plastic on was by far the hardest and most time consuming part of the job. Stretching it over the frame was easy but bringing it round the ends and making it a neat job took all day. We made a bit of a frame and hung an old flywire door each end to provide ventilation and to keep the wildlife out. The doors are made from Huon Pine which was salvaged from an old pub in Adelaide.

The finished job!!! It was way too hot inside from day one and we have had to put a 1.8m wide strip of 70% blockout shade cloth along the roof inside to reduce the heat. We barrowed in two year old fennel and mint mulch from a nearby farm and the tomatoes are going mad in there. We have also moved our frost tender geraniums in and they are thriving on the heat. We have lime, lemon and cumquat growing inside also.

Thank you . Just building our hot house now. Plastic from Waratah Launceston and pipe from Becks
I used 2 permapine planks running down each side of the tunnel just above ground level – the plastic goes on the outside of of the outer one, then folds back up on the other inner side. The inner plank was already fixed to the poly & droppers. Having done one side of the tunnel, I was then able to push down on the outer plank on the other side (while holding the plastic firmly) & this tensioned the plastic nicely while I whacked some screws in at 300mm intervals to hold the planks together ( again, the inner plank was already in place)- plastic did not tear. These last 2 planks will not line up exactly, but the job is kind of hidden behind the plastic, so doesn’t look too bad. Hope that’s all a bit clearer than mud!!
The finished product looks great.
Another less expensive way of making the hoops (that is by eliminating the droppers) is by placing lengths of a larger diameter of poly pipe into the ground approx. 500mm and slipping the hoop poly into it. When making my raised garden beds (approx. 5.0m x 2.5m x 400mm deep) I placed 500mm pieces of 50mm ID (inside diameter) vertically in each corner and approx. 1500mm apart along the sides, then hooped 32mm ID pipe poly inside the 50mm pieces so each touched ground level. We have only placed crop protection cloth over the frames to keep out the cabbage moth and other unwanted moths/critters, which has worked successfully.
As we live in a cooler climate (Mt Gambier) and had no success with melons, tomatoes and other summer growing crops we are looking at ideas to convert our hooped gardens beds into temporary poly tunnels so we can get them planted earlier and most importantly kept warm..
It would be appreciated if anybody has suggestions how to;
A. fix 200UB plastic to the poly hoops and treated sleepers without it tearing,
B. join the plastic sheets, as we can only find 2000mm wide material
Hi, very neat job. Am looking to build a tunnel for cuttings & seed raising & yours looks as good as any commercial variety. Did you just screw the side rails through the poly pipe or through the pipe & droppers?
Ian
Hi Ian, we screwed into the poly pipe only, but on a slight angle so the screw went in beside the dropper. We had arranged the droppers so that the fin was was pointing inwards to allow some space for the screw (if that makes sense). Cheers Nev and Bryon.
Thanks- yes, understood, I’ve knocked a lot of those droppers in the ground in a past life as a farmer!!
Very good job. I am in the process of making one myself, out of blue water pipes. If i remember, ill post a photo.
Very good job. I am in the process of making one myself, out of blue wayer pipes. If i remember, ill post a photo.
Most impressive,might have to build one.
I love this, and hope you don’t mind if I link to it from our page on transitionderwent.com?